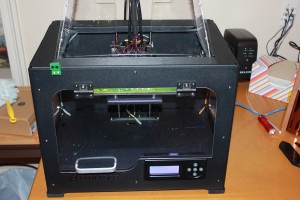
Okay, It’s been longer than I expected to create this next posting… And yes, I got totally distracted from posting the Missile Launch System (we will get back to it soon). The BIG distraction was I purchased a 3d printer, the QiDi Technology I Dual Extruder from Amazon.
QiDi Tech I 3d printer
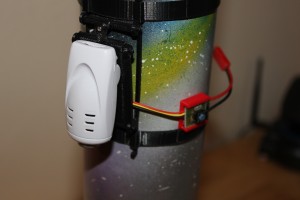
Then I spent the last two weeks learning everything I could about designing parts using Autodesk’s 3D design software (123D Design) and printing them in 3D. Using the software and printer I created a saddle and mount for an old Syma quadcopter camera I had laying around. I fabricated a control switch and a holder for the Lipo battery.
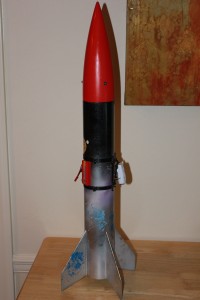
Syma 2.0Mp video camera mounted on my rocket named StrobeeCamera and on/off switchThe saddle, video camera mount, camera and Lipo battery pack.
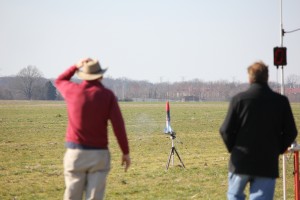
On Friday, David Duncan and I went to the launch site and made two successful launches with the Missile Command System and Strobee. The wind was blowing from 9 to 19 mph (as recorded by my on site weather station); that is why I am holding my hat on.
David Duncan and I Launching Strobee with the camera on and recording.
The first launch I used an AeroTech E20-4W single use motor. On board is a Jolly Logic AltimeterTwo (which I highly recommend).
As I have mention in a previous posting, I designed a Rocket Launch System which I named the Missile Command System, AKA the Launch-A-Rama (my wife’s name for it). Launching rockets goes way back in time for me and the biggest frustration was not having a ignition system that would actually launch the rocket when I wanted it to launch. I quickly learn that the cheap two-cell plastic units had a high-failure rate. Being an engineer automatically means you have to design and build some thing that works. So that, I did.
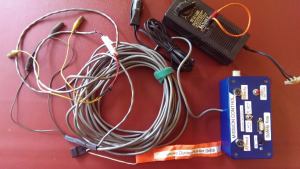
My First Really Good Version of a Launch System
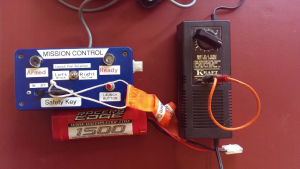
Because the old AA batteries in a plastic holder were never adequate, I designed the system around the 7.2 volt Ni-cad battery pack and a good Radio Shack developer box. One good characteristic of the Ni-cad battery is that it can deliver high amperage output, much more so than lead-acid gel-cell or alkalinebatteries. They are also rechargeable with a simple charger. The 1500mah battery packs I used were commonly used with R/C cars and trucks and they were fairly inexpensive. One additional feature I designed and included was that two rockets could be setup on the launch pad and launch one after the other. The circuitry checkedthe continuity of the igniter and indicated that the rocket was armed and ready to launch. This was a great systems and I used it for many years and as a backup while I developed the new Missile Command System. If you are interested in this design I think I still have the circuit schematic and the PC board layout.
This rocket is a highly modified version of the Estes Big Daddy. I extended the main body tube by 8 inches and I added an 8 inch Nomex chute protector. But, best of all, I added my “Rocket Locator” device in the nose (I am tired of losing rockets). The Locator adds three strobe lights in the nose and has a buzzer that starts after 2 1/2 minutes. It’s particularly cool to launch just as the sun is setting. You can see the lights in the second video and hear the buzzer come-on near the end. The first video is Strobee being launched using my Missile Command System (more about it later). This launch is using a AeroTech E20-4W single use motor.
Welcome to my new model rocket blog site. My plan is to show you the fun and interesting things that I have learned while building rockets. I have been building and launching model rockets for more than 45 years. I am a system’s engineer and have worked with solid rocket propellant on the Space Shuttle, most of the first-stage long-range missiles and other tactical missiles used for our national defense. I love using my engineering knowledge and skills to advance this hobby. I hope to excite you to join me in this great family activity.


 batteries. They are also rechargeable with a simple charger. The 1500mah battery packs I used were commonly used with R/C cars and trucks and they were fairly inexpensive. One additional feature I designed and included was that two rockets could be setup on the launch pad and launch one after the other. The circuitry checked
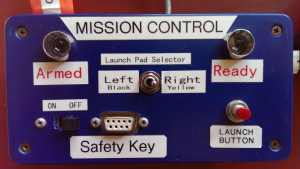 the continuity of the igniter and indicated that the rocket was armed and ready to launch. This was a great systems and I used it for many years and as a backup while I developed the new Missile Command System. If you are interested in this design I think I still have the circuit schematic and the PC board layout.